
How to Use a Tub Transfer Bench Safely: Step-by-Step Senior Guide (Getting In & Out Without Slipping)
The golden rule of tub transfer bench safety is simple: always sit down on the bench outside the tub first, then slide your body inward — never stand up to step over the tub wall. Standing transfers are the primary cause of bathroom falls among transfer bench users, even when the equipment itself is working properly.
Medical Disclaimer: This guide reflects standard occupational therapy (OT) transfer techniques used in home safety assessments and is intended for general education. If you or your loved one has significant balance impairment, recent hip or knee surgery, or a history of falls, consult a physical or occupational therapist for an individualized transfer plan.
Table of Contents
Pre-Transfer Setup: Adjusting the Bench Correctly
The majority of transfer bench accidents happen because of improper setup, not improper use. A bench that is too high, too low, or unleveled creates severe tipping hazards during weight shifts. Verify these three core setup checks before use.
Setting the Right Seat Height (The 90-Degree Rule)
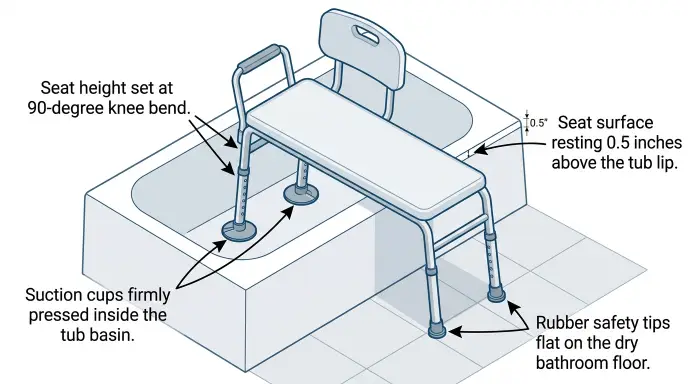
The seat height is properly adjusted when the user’s feet rest flat on the floor with knees bent at roughly a 90-degree angle.
- If knees sit higher than hips: The seat is too low, making standing up significantly harder and placing excessive strain on shoulder joints.
- If toes barely touch the ground: The seat is too high, creating instability when shifting weight.
- Elevation baseline: Adjust the bench legs so the seat surface rests approximately half an inch higher than the outer rim of the bathtub. This slight incline makes the inward scoot a smooth horizontal or slightly downward motion rather than an upward climb.
Once transferred and seated safely, use a seated handheld shower wand with a pause switch to rinse without twisting toward wall valves. While seated in the tub, avoid stretching or bending forward to wash lower legs and feet. Rely on safe seated bathing aids to reach your back and toes without losing balance.
Leg Placement: Inside vs. Outside Tub
A tub transfer bench straddles the tub wall: two legs sit inside the tub, and two legs sit on the outside bathroom floor. Because the interior floor of a bathtub is typically 1 to 2 inches higher or lower than the main bathroom floor, the inside and outside legs must be adjusted independently to keep the seat completely level.
- Inside-the-tub legs: Must feature strong suction cups pressed firmly onto a clean, smooth tub surface free of soap scum.
- Outside-the-tub legs: Must feature non-skid rubber feet placed directly on the dry bathroom floor. Never position the outside legs on top of a rug or bath mat, which can slide or bunch up under downward pressure.
Just like transfer benches, smaller bathing stools rely entirely on suction and friction—review our step-by-step tips on securing shower chair feet on wet tile to stop unwanted shifting during bathing. Before sliding across the bench to exit the tub, make sure your body and thighs are completely dry. Learning to dry off completely while seated prevents skin sticking or unexpected sliding on the bench.
Quick Setup Verification Checklist
| Setup Element | Correct Alignment | High-Risk Mistake |
| Seat Height | Knees bent at 90°, both feet completely flat on the floor | Seat too low (knees above hips) or too high (toes dangling) |
| Leg Adjustment | Inside legs set shorter/longer so seat remains 100% level | Equal leg heights, causing bench to tilt over the tub wall |
| Footing Surface | Direct contact on dry floor tile and clean tub basin | Outside legs placed on a loose mat; inside cups over soap scum |
Testing Stability Before Use
Before sitting down, place both hands on the bench seat and press downward firmly on each corner to test for wobble. Push side to side and front gently to back. If the bench rocks even slightly, level the legs and re-seat the suction cups. Make this 30-second stability check a daily habit, as suction cups naturally lose vacuum pressure over time.
How to Manage the Shower Curtain (The Zero-Water-Leak Hack)
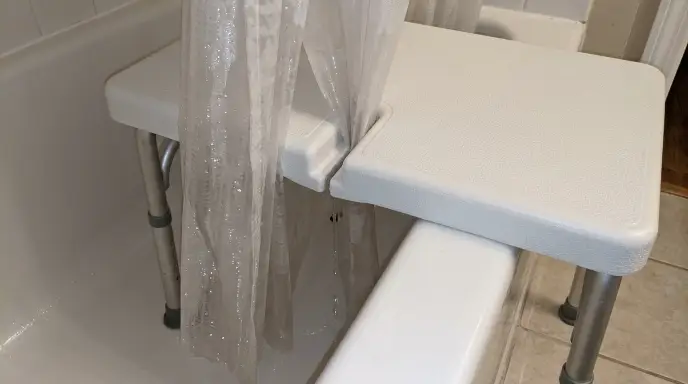
Because a transfer bench extends over the tub edge, standard shower curtains cannot close completely. This gap allows water to spray or drip directly onto the floor, creating the exact slip hazard the bench was installed to prevent.
- Solution 1: Use a Slit or Split Shower Curtain: Specially designed transfer-bench curtains feature vertical slits that let the fabric fall between the bench frame and the tub wall, closing the gap completely.
- Solution 2: The Seat Cut-Out Tuck: Most benches feature drainage slots or a small structural gap where the seat crosses the tub rim. Take the lower hem of the shower curtain and push it down through this gap so it hangs inside the tub basin. Any water hitting the curtain will drain back into the tub rather than pool on the floor outside.
For additional floor-drying techniques, read our guide on keeping your bathroom floor dry after a shower.
Step-by-Step: How to Enter the Bathtub Safely (The Scoot & Pivot Method)
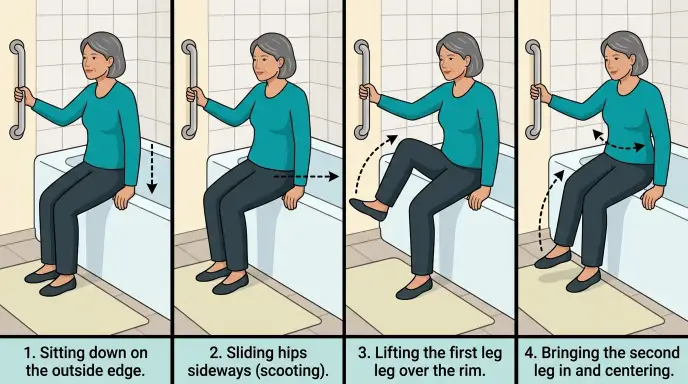
Follow this sequence in order every time. Rushing or attempting to stand up mid-transfer is where falls occur.
- Approach & Sit Down: Slowly back up toward the bench until the back of your legs touches the outside seat edge. Reach back with one hand to confirm your position, grasp the bench seat or wall grab bar, and lower yourself gently onto the outer portion of the seat.
- Scoot Inward: Do not attempt to stand. While keeping your full body weight supported by the seat, use your hands and planted feet to slide your hips sideways, inch by inch, toward the center of the bench.
- Lift the First Leg: Once your hips are positioned over the tub rim, grasp the bench handle or a stable wall bar. Lift your outer leg up and over the tub rim, placing your foot flat on the tub floor.
- Follow with the Second Leg & Center: Lift the second leg over the rim in the same controlled motion. Once both feet are safely inside the tub, scoot to the center of the bench, adjust your posture, and turn to face the shower controls.
Bathing While Seated: Crucial Safety Rules
- Switch to a Handheld Shower Head: A fixed overhead shower head forces you to twist, lean, or stand to rinse off. A handheld shower head mounted on an adjustable slide bar or low bracket allows complete control of the water flow while remaining seated.
- Keep Bathing Essentials Within Arm’s Reach: Position soap, shampoo, and washcloths in an accessible shower caddy before sitting down. Bending down to retrieve a dropped bottle from the tub floor is a major cause of balance loss.
- Verify Water Temperature Before Transfer: Always test the water temperature with your hand before sitting down on the bench. Sudden spikes in hot water can cause involuntary flinching and loss of balance.
Learn more about maintaining safe water temperatures with our guide on anti-scald valves for seniors and proper grab bar placement around the toilet and shower.
Step-by-Step: How to Exit the Bathtub Safely
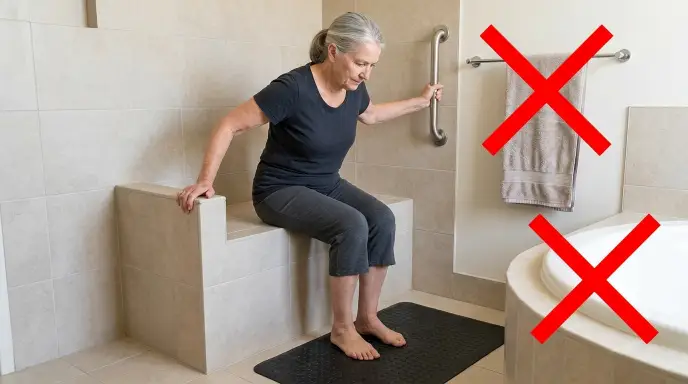
Exiting carries a higher statistical risk than entering because the user’s skin is wet, surfaces are slick, and warm water can cause mild muscle relaxation or lightheadedness.
- Dry Off While Still Seated: Do not attempt to move while dripping wet. Keep a towel within reach, and thoroughly dry your torso, arms, hands, and the bench handle before initiating movement. Dry hands on a dry handle eliminate the risk of grip slippage.
- Reverse the Legs (One at a Time): Turn your body slightly on the seat, grasp the bench handle, and lift your outer leg back over the tub rim. Place your foot firmly onto the outside floor. Then, lift the second leg over the rim.
- Scoot Toward the Outer Edge: With both feet now planted outside the tub, slide your hips back toward the outer edge of the bench seat until your knees are bent at a comfortable standing angle.
- Push Up to Stand (Never Pull): Place your hands on the bench frame or a securely mounted grab bar. Push downward through your legs and arms to rise to a standing position. Never pull on towel bars, shower doors, or the tub rim, as none of these fixtures are designed to support human body weight.
Ensure your landing zone is secure with our recommendations on non-slip bathroom rugs for seniors.
Common Mistakes That Cause Transfer Bench Falls
- Lifting both legs over the rim simultaneously: This eliminates ground contact and drastically compromises pelvic stability. Always move one leg at a time.
- Perching on the bench edge: Sitting too close to the front or outer perimeter creates an uneven center of gravity that can cause the bench to tip.
- Installing suction feet over dirty tiles: Soap scum, mold, or textured tile surfaces prevent suction cups from forming an airtight seal. Clean the tub surface thoroughly before installation.
- Leaving the outer entry blocked: Placing an armrest on the outside portion of the bench blocks the entry path and prevents a smooth, unobstructed sideways slide.
Frequently Asked Questions
Can one person use a transfer bench without help?
Yes. Once the scoot-and-pivot technique is mastered and the bench is properly sized, most seniors can transfer independently. However, having a family member or caregiver supervise the first few transfers is strongly recommended until the sequence becomes second nature.
Which side does the armrest go on?
The armrest/handle goes on the side positioned inside the bathtub. This gives the bather a secure, stable point to hold while sitting and washing. The outside portion of the bench must remain completely open and unobstructed so the user can sit down and slide across without impediment.
How much weight can a standard tub transfer bench hold?
Standard transfer benches generally have a weight capacity ranging from 300 to 400 lbs. For individuals who need greater structural support, bariatric transfer benches use heavy-duty aluminum or steel frames and support 500 lbs or more.
If shifting your weight over the tub wall becomes increasingly difficult even with assistance, it may be time to consider permanent walk-in bathing solutions that eliminate high thresholds.
Related reading: Shower Chair vs. Transfer Bench: Which Is Right for Your Bathtub?
· Complete Aging-in-Place Bathroom Guide





8 Comments