
Walk-in Shower Grab Bar & Bench Placement: Exact Heights for Senior Safety
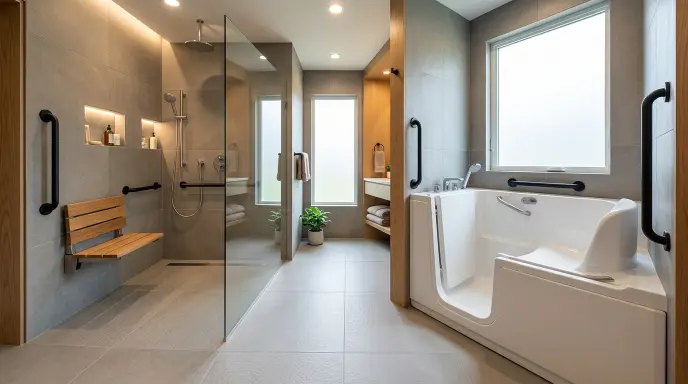
Nearly 80% of bathroom falls happen during the transition into or out of the shower — the single most dangerous few seconds in the entire home. While establishing a complete senior bathroom safety checklist is essential, securing the wet shower zone requires exact layout measurements. The good news? Most of these accidents are completely preventable with correct walk-in shower grab bar placement. Proper bar placement ensures stability while stepping inside. However, if you are still determining whether a seated soak or a roll-in base suits your physical needs best, explore how a walk-in shower compares to a walk-in tub before drilling into tiles.
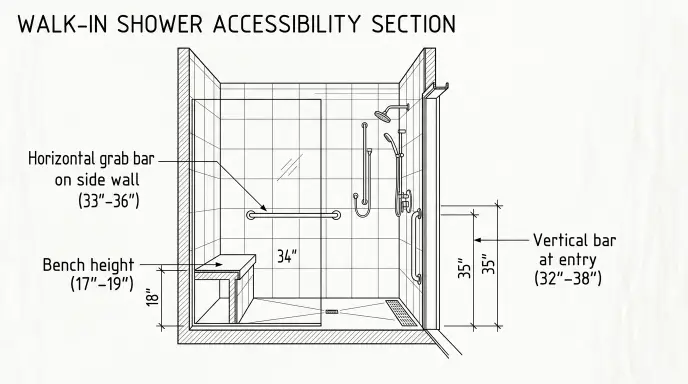
Quick Answer: The standard grab bar height for showers is 33 to 36 inches from the finished floor, with vertical bars at entry points mounted between 18–24 inches long. A properly placed shower bench sits at 17–19 inches, matching standard chair height. Below, we break down the exact measurements, zones, and layouts you need to make any walk-in shower senior-safe.
Table of Contents
At-a-Glance: Quick Placement & Height Cheat Sheet
This table gives you the exact numbers before you even pick up a drill:
| Location / Bar Type | Recommended Height (from floor) | Bar Orientation | Primary Purpose |
| Entry / Threshold | 32″–38″ (bar spans 18″–24″ vertically) | Vertical | Stability while stepping in/out |
| Back Wall (Standing Zone) | 33″–36″ | Horizontal | Balance while washing/shampooing |
| Shower Control Wall | 33″–36″ (extending to 42″) | Vertical or L-shaped | Support while adjusting water controls |
| Bench Transition (Sit-to-Stand) | 6″–9″ above seat (≈33″–36″ from floor) | Horizontal or Diagonal | Push-off support to sit or stand |
| Shower Bench Seat | 17″–19″ | N/A (Seat height) | Safe, low-strain sitting position |
Tip: Keep this chart handy while installing — it covers over 90% of walk-in shower configurations for aging-in-place safety.
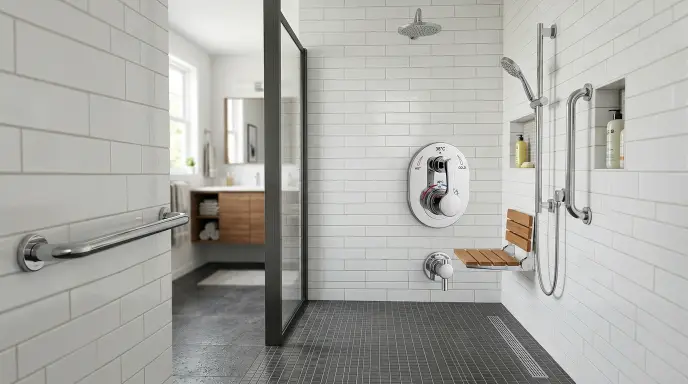
The 3-Zone Grab Bar Layout for Walk-in Showers
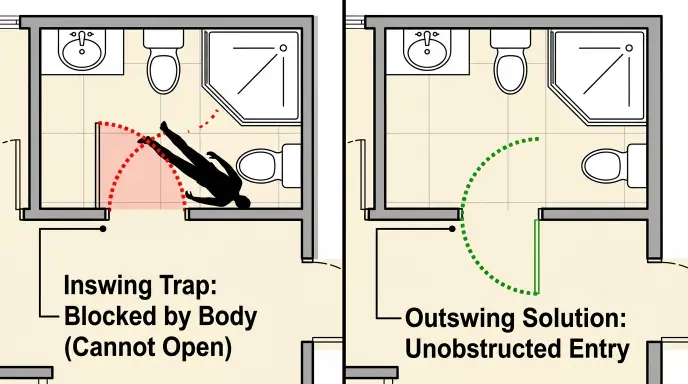
Instead of randomly placing bars, safety professionals divide a walk-in shower into three functional zones. This systematic approach ensures no critical movement is left unsupported. If you are using a walker or wheelchair to reach the shower, standard doors can restrict frame width. Installing swing-clear hinges and outward-opening doors can expand your doorway width while preventing entrapment during a fall.
Zone 1: Entry & Exit (The Threshold)
This is where most falls occur, since wet feet meet a sudden change in floor friction and elevation.
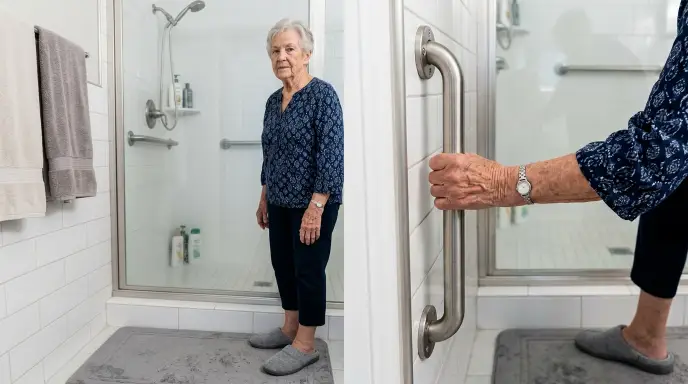
- A vertical grab bar (18–24 inches long) is safest here because it supports the body through the full up-and-down motion of stepping over a curb.
- Mounting height: Begin the bar around 32–38 inches above the finished shower floor, extending upward.
- Glass Enclosure Warning: If a glass door or partition is present, locate structural wall studs beside the door jamb. Never anchor grab bars directly onto hollow aluminum tracks or unsupported glass channels.
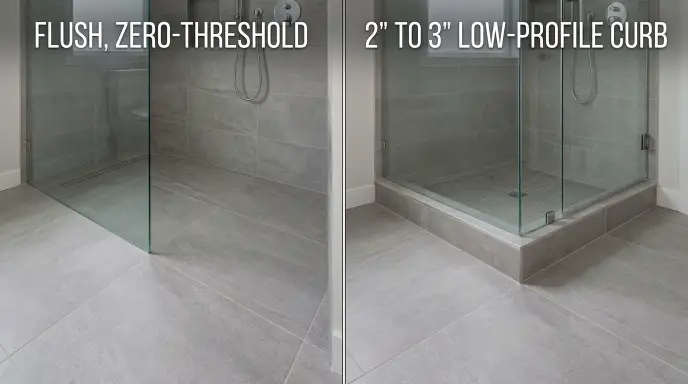
Grab bar height and placement at the threshold will vary depending on whether you are navigating curbless and low-curb shower entries.
Zone 2: The Shower Controls & Faucet Wall
Seniors frequently lose balance while leaning forward to turn on valves or test water temperature.
- Mount a vertical or L-shaped grab bar right beside the control knob. This lets the user hold firmly with their dominant hand while adjusting water flow with the other.
- Height: Maintain the horizontal segment at 33–36 inches, with the vertical segment extending toward shoulder height (up to 42 inches) for taller individuals.
While grab bars provide balance inside the stall, pairing them with an anti-scald mixing valve prevents bathers from recoiling from sudden bursts of scalding water.
Zone 3: The Back & Side Walls (Standing/Shampooing Zone)
This is the primary washing zone, where closed eyes and slippery suds create sudden dizziness or balance loss.
- Install a long horizontal bar at 33–36 inches along the longest wall.
- For large walk-in enclosures, add an intersecting bar on the adjacent side wall at the same height to provide a continuous, wraparound hand-hold.
When mapping your stall walls, ensure support rails don’t block access to a waterproof shower fall alert pull cord, keeping the cord handle hanging 4 to 6 inches above the floor.
Shower Bench Placement: Where and How to Position It
Many DIY guides skip seating geometry entirely, but bench placement is just as critical as grab bar security. Placing a grab bar within easy reach of the seat relieves rotational stress on the chair’s armrests, which is a primary step in stopping shower chairs from tipping over when rising from a sit.
Built-in vs. Freestanding Shower Benches
- Built-in Benches: Position these out of the direct line of high-pressure water spray to keep the surface from becoming slick. A corner placement opposite the showerhead works best.
- Freestanding Benches: Offer flexibility but must never block the drain. Leave at least 4–6 inches of clearance to maintain proper water flow and stop water pooling on the bathroom floor around the bench legs.
Ideal Bench Height for Seniors
Senior ergonomic safety follows standard seating physics:
- Seat height: 17–19 inches, equal to a typical dining chair. Keeping seat heights uniform throughout the room improves muscle memory — see our comparative breakdown on toilet safety rails vs. raised toilet seats to maintain consistent seating mechanics.
- Keeping seat heights uniform throughout the home improves muscle memory.
Integrating Grab Bars with the Shower Bench (The Sit-to-Stand Zone)
The transition between sitting down and standing back up under wet conditions is statistically the highest fall-risk moment inside the stall. Many seniors hesitate to drill into shower tiles, but our breakdown on suction vs. screw-in grab bar safety explains why screwed-in hardware is non-negotiable for wet stalls.
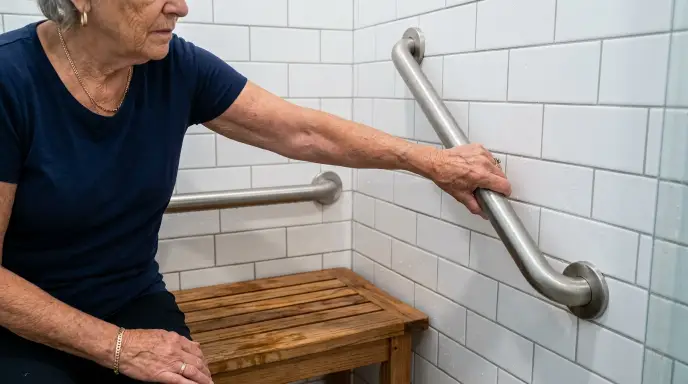
- Horizontal Grab Bar: Mount directly on the side wall 6–9 inches above the bench seat (roughly 33–36 inches from the floor). This provides an ergonomic downward push-off surface.
- Diagonal (Angled) Grab Bar: For seniors living with severe arthritis or limited wrist mobility, a 45-degree diagonal bar is far superior. It matches the natural angle of the forearm, allowing a steady pull-up motion without bending the wrist backward.
- Clearance Distance: Keep the grab bar within 12–16 inches horizontally from the front edge of the bench seat. Placing it farther away forces the user to lean forward precariously before gaining support.
ADA Commercial Standards vs. Residential Realities
The Americans with Disabilities Act (ADA) recommends grab bars mounted between 33 and 36 inches above the floor. While this standard is reliable for public facilities, private residential installations should be tailored to the individual user. While these guidelines apply specifically to shower stalls, read our comprehensive guide on grab bar placement for seniors for exact heights across the entire bathroom, including bathtubs and sink areas.
Formula for a Custom Fit:
- Standing Support Height: Measure from the floor to the user’s bent elbow while standing barefoot. Mount the main horizontal bar exactly 2 inches below that elbow level.
- Sitting Support Height: Have the user sit on their shower bench with arms resting naturally at their sides. The bar should align comfortably with their mid-forearm.
Tip: For seniors shorter than 5’2″ or taller than 6’2″, standard ADA heights often cause shoulder impingement or overreaching. Always customize within 1–2 inches of their actual reach.
Critical Safety & Installation Rules (Do Not Skip)
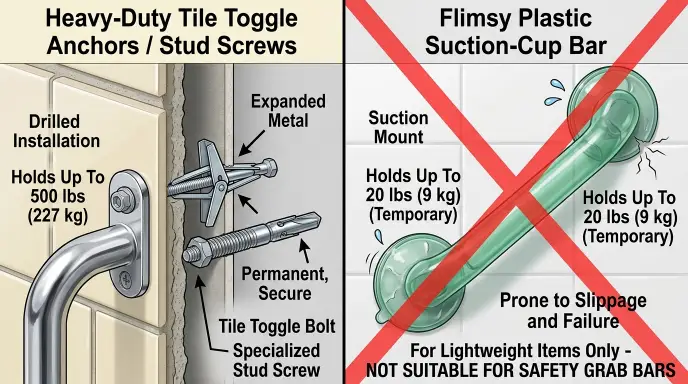
- Never Use Suction-Cup Bars: Suction bars rely on temporary air vacuums that degrade quickly in warm, humid air. They routinely detach under sudden body weight. Only install screw-anchored bars rated for senior support.
- Stud Mounting vs. Hollow Wall Anchors: Whenever possible, secure at least one side of the mounting flange directly into a 2×4 wall stud using stainless steel screws. If studs do not line up with your layout, use commercial-grade waterproof hollow-wall anchors (such as SecureMount or heavy-duty toggle bolts).
- Weight Rating: Choose grab bars certified to support a minimum of 250–300 lbs (ADA minimum is 250 lbs). Dynamic fall weight often doubles static body weight during a slip.
- Surface Texture: Polished chrome becomes dangerously slick when coated with soap scum. Choose knurled, textured, or brushed matte finishes for dependable wet grip.
Recommended Shower Safety Gear (Buyer’s Checklist)
- Heavy-Duty ADA Grab Bar: 1.25″ to 1.5″ outer diameter, 304 stainless steel construction, textured anti-slip grip, 300+ lbs capacity.
- Adjustable Shower Bench with Handles: Non-slip rubber feet, built-in drainage slots, textured seat surface, tool-free height adjustment (17″–19″).
- Solid Wall Mounting Anchors: Waterproof expanding toggle anchors specifically rated for ceramic tile, marble, and fiberglass backing.
Frequently Asked Questions
What is the standard height for grab bars in a walk-in shower?
The standard height is 33 to 36 inches from the finished shower floor for horizontal bars. Vertical entry bars generally start at 32 to 38 inches above the floor and extend upward 18 to 24 inches.
Should grab bars be installed vertically or horizontally?
Both orientations serve distinct purposes. Vertical bars are best at entry thresholds to support pulling and stepping over curbs, while horizontal bars along side walls provide continuous lateral stability while standing and washing.
Can you safely mount grab bars on fiberglass shower walls?
Yes, but you cannot screw directly into bare fiberglass without backing support. You must use specialized hollow-wall mounting plates or heavy-duty structural toggle anchors designed to disperse weight across the fiberglass panel.
How far should a grab bar be from the shower bench?
A support bar should sit 6 to 9 inches above the seat surface and within 12 to 16 inches horizontally from the seat’s front edge, allowing effortless push-off leverage without forcing the user to reach or lean.
Summary Checklist for a Fall-Proof Shower
- Entryway: 18–24″ vertical bar starting at 32–38″ from the floor.
- Control Wall: Vertical or L-shaped bar beside the valve at 33–36″.
- Main Washing Wall: Continuous horizontal bar at 33–36″.
- Seating Area: Bench set at 17–19″ with a dedicated grab bar 6–9″ above the seat.
Securing the shower enclosure eliminates the biggest slipping hazard, but full protection requires a holistic approach. Explore our complete aging-in-place bathroom guide to audit your doorways, vanity clearances, and non-slip surfaces. While securing your shower with properly anchored grab bars prevents slipping during bathing, don’t overlook the toilet area. For seniors with severe mobility limits, reaching behind to wipe remains a major tipping hazard. Pairing a secure toilet setup with an arthritis-friendly bidet attachment removes the need for unsafe twisting altogether.



12 Comments