
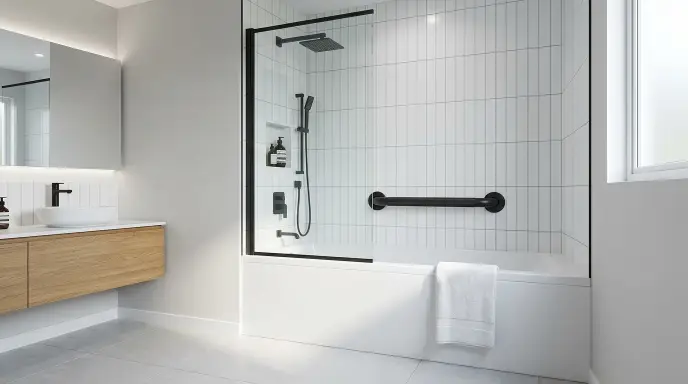
Exact Grab Bar Placement for the Elderly: ADA Heights & Stud Guide
By Sarah | Reviewed by James Whitfield, CAPS | Fact-Checked for ADA & Fall Prevention
Safety Notice: Grab bar installation directly affects physical safety and fall prevention. The measurements in this guide follow ADA 2010 Standards, Section 609, and load requirements outlined in ASTM F446. That said, exact heights should still be verified against the specific user’s mobility, height, and reach — a licensed Occupational Therapist (OT) or Physical Therapist (PT) can help fine-tune placement for someone recovering from surgery or dealing with a progressive condition. Always seal wall penetrations with 100% silicone caulk to prevent moisture from getting behind the tile and rotting the stud over time.
Having spent years helping aging family members retrofit their homes — and working alongside licensed accessibility installers — I’ve seen far too many well-meaning setups go terrifyingly wrong. A loving relative grabs a bar and screws it straight into drywall using cheap plastic anchors, often six inches away from where hands naturally reach. Then a sudden dizzy spell hits, someone leans their full weight on it, and the entire thing rips right out of the wall, drywall dust and all.
This guide gives you the real numbers: exact heights, distances, stud spacing, sealing steps, and anchor types rated for actual fall-impact force — not just static weight. No guesswork, no vague “install at a comfortable height” advice. Before measuring mounting heights, make sure you understand the difference in holding strength between permanent wall-mounted and suction grab bars.
Quick Summary / Key Takeaways
- Standard Height: 33 to 36 inches from the finished floor to the top of the gripping surface (ADA Section 609.4).
- Shower & Tub: Two horizontal bars on the back wall, plus one vertical bar at the entry point, 18–24 inches long.
- Toilet Area: A 42-inch bar on the side wall and a 36-inch bar on the rear wall.
- Mounting Rule: Anchor into solid wood wall studs. Bars must withstand a minimum of 250 lbs of shear and pull force under dynamic (impact) loading — not just static body weight.
- Waterproofing: Every screw penetration through tile must be sealed with 100% silicone caulk to prevent hidden water damage.
Table of Contents
The Golden Rule: ADA Heights vs. Real-World Needs for Seniors
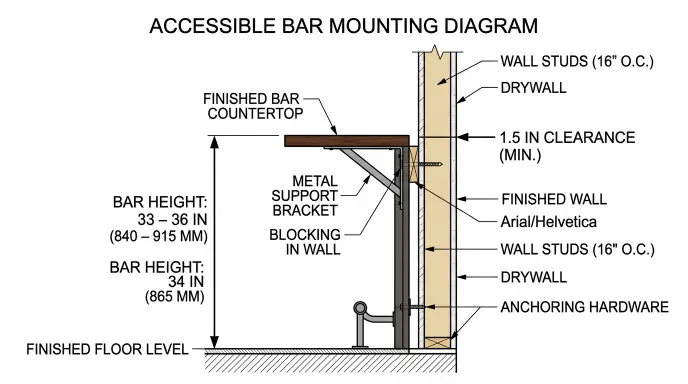
ADA Section 609 sets grab bar standards primarily for commercial and public accessibility spaces — think hospital bathrooms and hotel rooms built for wheelchair users. It’s a solid starting reference for a home bathroom, but it’s not gospel. Your mother-in-law, who’s 5’2″ with a bad hip, needs something different than a code written around a standardized wheelchair transfer height.
Exact ADA Standard Height (33″–36″ Rule)
Mount the top of the gripping surface between 33 and 36 inches above the finished floor, per ADA 609.4. This range lines up with where most adults naturally bend their elbow when reaching for support — close enough to grab quickly without stooping, high enough that you’re not hunched over using it daily. Mount grab bars within direct reach of seated transfers, especially if you are installing a transfer bench or shower chair to assist with tub entry and exit. While non-installed safety rails may qualify as durable medical equipment, wall-mounted bars have different rules. Read our guide on how to get bathroom grab bars covered through supplemental Advantage benefits or free community programs. Before drilling into studs, perform a room-by-room bathroom safety inspection to confirm the exact height and placement needed for all high-risk zones.
Always measure from the finished floor — after tile is installed, not the subfloor. I’ve seen installers measure before tile goes down and end up an inch low once the flooring is complete. That single inch matters more than most people assume, especially for someone with limited shoulder mobility.
When to Break ADA Rules for Personal Mobility
Codes are written for an average body. Real people aren’t average, and ADA itself acknowledges some flexibility for residential, individualized use.
- Shorter seniors (under 5’4″): Drop the bar closer to 30–32 inches.
- Taller individuals: Push it toward 38 inches if needed.
- Arthritis or limited grip strength: Position bars slightly lower so the user can push down with a palm rather than pull with fingers, reducing joint strain.
- Recent hip or knee replacement: A PT will often specify an exact height based on the person’s current gait and weight-bearing restrictions. If someone in the house has had recent surgery, get that number from their therapist before drilling anything permanent.
Rule of thumb: install for the person in front of you, not the code book.
Diameter and Clearance
Per ASTM F446 (the standard covering grab bar hardware performance), the bar diameter should fall between 1¼ and 1½ inches. Anything thinner is hard to grip firmly, especially with arthritic hands. Anything thicker, and the hand can’t fully wrap around it — which weakens the hold exactly when it’s needed most.
Leave 1½ inches of clearance between the bar and the wall. Too tight, and fingers get pinched or can’t achieve a full grip. Too wide, and a forearm can slip through during a fall, which is actually more dangerous than having no bar at all — the arm can get trapped at an awkward angle while the body continues falling. A properly anchored vertical or angled bar provides critical leverage when executing a seated tub transfer onto a bench.
Zone 1: Bathtub Grab Bar Placement (Critical Slip Zone)
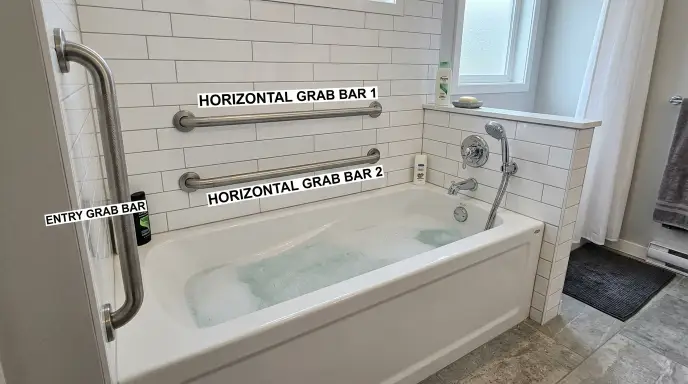
This is also where I recommend pairing grab bars with a safer tub entry solution if the tub wall is unusually high — check out our guide on making a high-step bathtub safe without remodeling for more on that. If your bathroom layout makes wall-mounting impossible—or you are renting and cannot drill into wall studs—standalone aids are your best alternative. Choosing between toilet safety rails vs. raised toilet seats allows you to add vital sit-to-stand leverage and joint relief without putting a single hole in your tile.
The Entry/Exit Vertical Bar (The Step-Over Anchor)
Install an 18- to 24-inch vertical bar on the wall at the outer edge of the tub, positioned so the user can grab it before lifting a leg over the tub wall — not after they’re already off-balance. Start the bar about 6 inches above the tub rim and let it run upward.
This bar has one job: giving something solid to hold during the most unstable second of the entire bathing routine — when one foot is already inside the tub, and the other is still planted on the bathroom floor. Installing a grab bar adjacent to your dressing seat gives you the leverage needed to pull up pants securely. For the complete sequence of using these supports, read our guide on how elderly adults can dress safely after bathing. Threshold heights determine where your primary support bars must sit, which is a major factor when planning safe entry for walk-in tubs and showers.
Back Wall Horizontal Bars (Sitting and Rising)
Install two bars on the back wall, not one:
- Lower bar: 8 to 10 inches above the tub floor, for pushing up from a seated position or shower bench.
- Upper bar: 33 to 36 inches from the floor, for stability while standing and washing.
A full-length bar isn’t necessary here — 24 to 36 inches of horizontal coverage handles most reach requirements without cluttering the wall.
Faucet/Control Wall Bar
A shorter 12–16 inch bar near the faucet wall provides extra support while reaching to adjust water temperature or shower controls — a moment when people often lean forward without realizing they’ve shifted their center of gravity. Instead of grabbing onto fragile towel bars or vanity edges, installing a wall-anchored support bar is essential. For the full layout guidelines, check out our guide on bathroom sink safety and vanity modifications.
Zone 2: Walk-In Shower Grab Bar Placement
Horizontal vs. Diagonal Bars
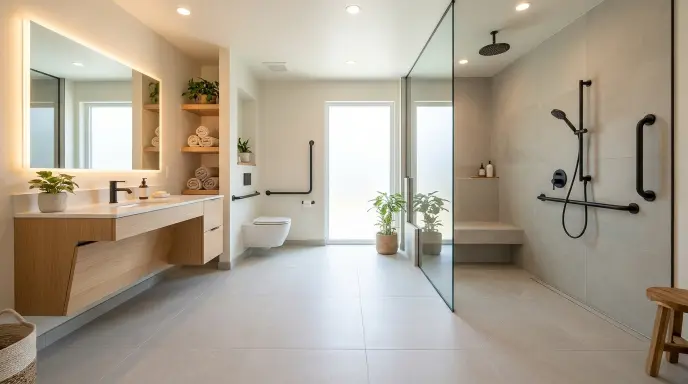
For seniors dealing with arthritis, a diagonal bar mounted at roughly a 45-degree angle is often easier to grip than a straight horizontal one. The angle lets the hand settle at whatever height feels comfortable along the bar, rather than forcing a fixed grip point, which reduces strain on stiff finger and wrist joints. While general bathroom grab bars follow standard 33–36 inch guidelines, curbless or barrier-free stalls need dedicated planning. If your home has a roll-in or barrier-free layout, read our step-by-step walk-in shower grab bar and bench placement guide for exact multi-zone measurements.
Diagonal bars also work well for transitional movement — going from standing to reaching down for a washcloth or soap dish.
Placement Near Shower Seats/Benches
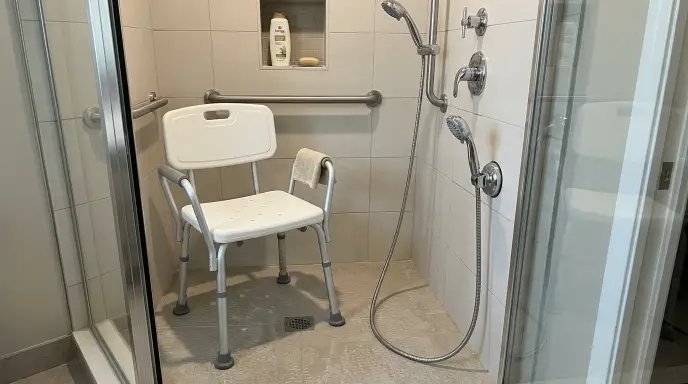
If there’s a fold-down bench or shower seat, mount a bar 8 to 10 inches above seat height, positioned slightly forward so the user pushes off with a straight arm instead of reaching backward or sideways — a motion that throws off balance during the stand-up phase.
Zone 3: Toilet Area Grab Bar Placement
Side Wall Configuration
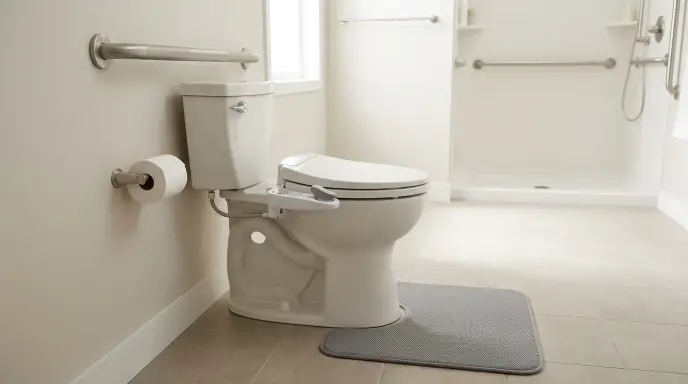
Install a 42-inch bar on the side wall, starting 12 inches out from the back wall. The front end should extend past the front edge of the toilet bowl, providing support through the entire sit-to-stand motion, not just at the beginning of it. Installing a side grab bar provides essential stabilization during personal hygiene routines. Resting a non-dominant hand on a secure bar prevents accidental falls while using adaptive aids or mastering safe wiping techniques with arthritis.
Rear Wall Configuration
Add a 36-inch bar on the wall directly behind the toilet, centered but shifted enough to clear the flush handle and tank lid. Mount at the standard 33–36 inch height.
Drop-Down (Foldable) Bars for Tight Bathrooms
Small bathrooms without a side wall next to the toilet often need a foldable drop-down bar instead. These mount to the wall behind the toilet and swing down to about 28–30 inches above the floor — lower than a standard side bar, since the user is typically already partially seated when using it.
Make sure the mounting point still lands on a stud. Foldable bars take more torque stress than fixed horizontal bars because of the repeated up-and-down swinging motion, and a hollow-wall anchor alone often isn’t enough for this application long-term.
Step-by-Step: How to Locate and Mount into Wall Studs
Step 1: Finding 16-Inch On-Center Studs Behind Tile
Standard construction places studs 16 inches on center, though bathrooms sometimes deviate due to plumbing chases behind the tub or shower. A magnetic stud finder can pick up nail or screw heads in the tile backer board, but it’s not always reliable through thick porcelain tile.
Better approach: use an electronic stud finder set to deep-scan mode, then confirm with a few test taps — solid wood sounds noticeably different from a hollow drywall cavity. If you’re still unsure, drill a small pilot hole in a spot that’ll end up hidden under the bar’s mounting flange, letting you verify placement without leaving a visible mistake.
Step 2: Drilling Through Porcelain and Ceramic Tile Without Cracking
Use a diamond-tip masonry bit — a 5/16″ carbide-tipped bit works for most standard screw sizes. A regular metal twist bit will skate across the glaze and crack the tile before it even starts cutting.
Start slow, at low RPM, and keep the tile wet during drilling. A damp sponge held near the bit, or a spray bottle with water, keeps the diamond coating from overheating and reduces the chance of hairline cracks spreading across the tile face.
Apply a strip of painter’s tape over the drill spot first — it gives the bit something to grip on the first pass instead of sliding across the smooth glaze.
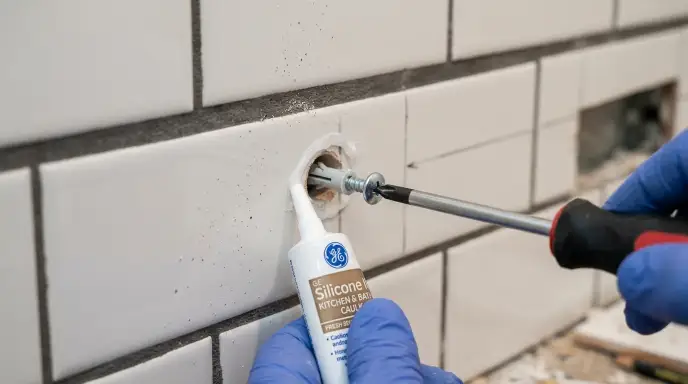
Step 3: Fastening Heavy-Duty Stainless Steel Screws
Once you’ve drilled through the tile and into the stud, switch to a standard wood bit sized for a pilot hole. Use stainless steel screws, 2.5 to 3 inches long, driven directly into solid wood. Stainless resists corrosion from constant moisture exposure far better than plain zinc-coated screws, which matters over years of daily shower use.
Seal every hole. Before fully tightening the mounting flange, apply a bead of 100% mildew-resistant silicone caulk around the screw hole and behind the flange itself. This step gets skipped constantly, and it’s the reason so many “solid” grab bar installations end up with rotted studs and moldy backer board five years down the line. Water finds its way through the tiniest gap around a screw shaft, and once it’s behind the tile, you won’t know there’s a problem until the bar starts wobbling.
Don’t overtighten the screws — stripped screw heads or cracked tile from over-torquing are common mistakes at this stage.
Content Gap: What If There Are No Studs Where You Need a Bar?
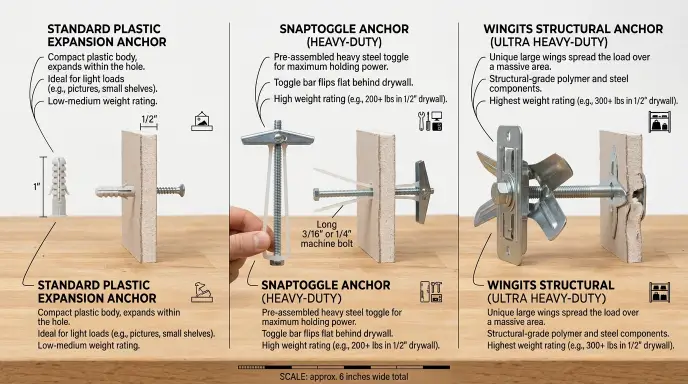
This happens more often than people expect. The ideal grab bar location and the actual stud location don’t always line up — especially around tub surrounds where studs may be spaced irregularly to accommodate plumbing.
Heavy-Duty Hollow Wall Anchors (SnapToggle & WingIts)
When a stud isn’t available in the right spot, SnapToggle and WingIts anchors are the two most trusted options in the trade. Both are rated to hold 300–500 lbs in drywall or tile-over-drywall applications when installed correctly.
SnapToggle anchors work by expanding a metal toggle wing behind the wall, spreading the load across a much wider area than a standard plastic anchor ever could. WingIts anchors are specifically engineered and marketed for bathroom grab bar applications, with several models tested well beyond the 500 lb mark.
Never use standard plastic drywall anchors for a grab bar. They’re built for hanging picture frames, not absorbing the sudden dynamic force of a body catching itself mid-fall.
Wall Blocking for New Construction or Remodels
If you’re remodeling a bathroom or building one from scratch, don’t rely on finding a stud in the exact right spot — install solid wood blocking ahead of time. For a full blueprint on planning accessible layouts and clearances, see our aging-in-place bathroom guide. Before the drywall or backer board goes up, add horizontal 2×6 or 2×8 blocking between the studs at the height range you expect to need grab bars, roughly 24 to 40 inches from the floor covers most future placement needs.
This one step solves the entire “no stud where I need it” problem permanently, and it costs almost nothing during a remodel compared to retrofitting anchors later. If you know an aging family member will need bars eventually, even if not today, put the blocking in now while the wall is open.
The Danger of Suction-Cup Grab Bars
Suction-cup bars sold online and in some pharmacies create what I’d call false security. They hold fine during a quick tap test on a clean, dry, flat surface — but they were never engineered to bear sudden, full-body dynamic weight during an actual fall.
Suction seals weaken with soap scum buildup, temperature swings, and time. A bar that felt solid the day it went up can release without warning months later, right at the moment someone grabs it hardest. If a suction bar is genuinely the only option in a rental or temporary situation, treat it as a minor aid — not a real safety device you can trust your full weight to.
Understanding Weight Rating vs. Actual Fall Force
Here’s something a lot of product listings get wrong: a “250 lb weight capacity” sounds like it means static body weight, but that’s not the full picture. ADA and ASTM ratings for grab bars refer to shear and pull force under dynamic loading — meaning the sudden, sharp force generated when someone grabs the bar mid-fall, not the gentle pressure of leaning on it while standing still.
When an elderly person starts to fall and grabs a bar, the force generated can exceed their actual body weight by a significant margin because of the sudden deceleration involved. A 150 lb person falling can generate well over 250 lbs of force on that bar in the split second it stops their fall. This is exactly why plastic anchors and towel bars fail — they’re rated for static load, not impact force, and a real fall is seldom static.
Grab Bar Sizing & Placement Quick Reference
| Bathroom Zone | Bar Length & Type | Height from Floor | Primary Function |
| Tub Entry | 18″–24″ Vertical | Starts 6″ above tub rim | Balance during step-over |
| Tub Back Wall | 36″–48″ Horizontal | 33″–36″ from floor | Standing shower support |
| Tub Lower (Seated) | 24″ Horizontal | 8″–10″ above tub floor | Push-up support from seated position |
| Toilet Side Wall | 42″ Horizontal | 33″–36″ (starts 12″ from rear) | Sit-to-stand support |
| Toilet Rear Wall | 36″ Horizontal | 33″–36″ (centered) | Rear balance support |
| Shower Transfer Seat | 24″ Angled (45°) | 8″–10″ above seat | Low-effort push to standing |
A sturdy grab bar is only effective if a senior can locate it instantly in low light; pair physical supports with proper senior bathroom night light placements around the toilet and shower entrance.
Essential Safety Features to Look for Before Buying
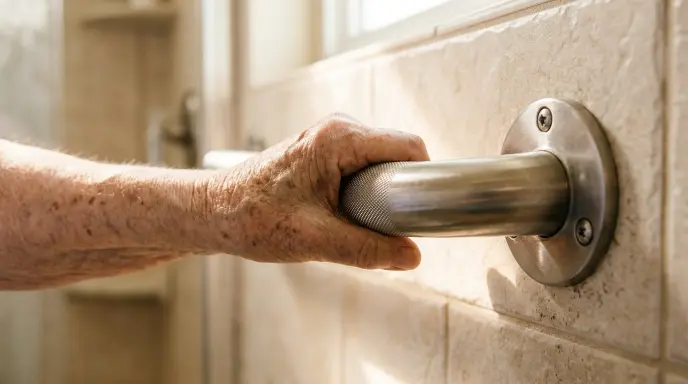
Texture Matters: Skip smooth chrome finishes entirely. A knurled (textured) surface or PVC-coated non-slip grip stays secure even with wet, soapy hands — chrome gets slick fast and offers almost no traction exactly when it’s needed most.
Weight Rating: Look for a documented minimum 250–350 lb dynamic load capacity, tested to ASTM F446 standards. If a product listing doesn’t state a rating anywhere on the packaging or spec sheet, skip it — that’s usually a sign it hasn’t been tested to any real standard.
Frequently Asked Questions
What is the best angle to install a shower grab bar?
A 45-degree diagonal placement generally works best for seniors with limited grip strength or arthritis, letting the hand settle at a comfortable point along the bar rather than forcing one fixed grip height.
Can you mount grab bars directly into fiberglass tubs?
Not recommended. Fiberglass tub walls flex and can crack under sustained weight or sudden force. Grab bars need to anchor into the actual wood stud behind the tub surround, not into the fiberglass material itself.
Do grab bars have to be placed into studs?
Whenever possible, yes. If a stud isn’t available in the ideal spot, a rated heavy-duty anchor like SnapToggle or WingIts, rated for 300–500 lbs, is an acceptable alternative. Standard plastic anchors are never safe for this application, regardless of what the packaging claims.
What is the difference between towel bars and grab bars?
Towel bars are designed to hold the static weight of a wet towel — a few pounds at most. They’re typically mounted with light-duty anchors into drywall alone, with no dynamic load rating. Leaning on one during a loss of balance can pull it straight out of the wall, turning a minor stumble into a serious fall. Grab bars are engineered and rated specifically to handle sudden full-body impact force, not just steady weight.
Next Steps for Complete Bathroom Safety
Grab bars are one piece of a larger safety picture. Pair them with high-traction surfaces by reviewing the safest bathroom flooring options for seniors, adequate lighting, and clear walking paths. For the complete room-by-room breakdown, check out our full Bathroom Safety for Seniors: A Complete Fall-Prevention Checklist to cover everything else in the space.
Expert Review & Individual Safety Advisory
This guide was produced by Sarah, Founder at Agefolk, who applies years of personal caregiving insight and rigorous home modification research to keep seniors safe and independent.
To ensure structural safety and absolute compliance, this piece was technically reviewed by James Whitfield, CAPS, verifying all hardware load limits, ADA specs, and tile anchoring methods.
Please Note: Grab bar placement must adapt to the individual, not just the code. We strongly suggest consulting a licensed Occupational Therapist (OT) or a certified contractor to customize these heights to the user’s specific reach, stride, and mobility needs.

18 Comments